I’ve been a long time user of Linux and the command line, but not until recently have I used the amazing program: screen. Screen is a terminal multiplexor. This means you can have multiple sessions open at the same time (even over a single ssh connection) and flip back and forth between them.
Prior to discovering screen I’d often be ssh’d into a remote server editing a file when the ssh session would time out or drop and I’d have to quickly open up a new terminal and start editing the file again. Now while using screen, the screen session itself is independent of the ssh session. So if my ssh connection flakes out, I start up a new terminal, ssh into the server, “reattach” the previous screen session to this new terminal and all of my work: my emacs window, my bash jobs, etc are still running in the screen session!

How to start screen

bart@home: $ ssh boris@remote-server-in-distant-vladivostok
boris@distant-vlad: $ screen

If you already have a screen session running on the remote server you can reattach with:
boris@distant-vlad: $ screen -r

I like to use the options: -raAd, mostly because it looks raad.
boris@distant-vlad: $ screen -raAd

r: means reattach previous session
a: include all capabilities (with some minor exceptions) in each window’s termcap
A: Adapt the sizes of all windows to the size of the current terminal
d: Forceably detach any sessions that are still holding on to this (your workstation at work for instance).

Create new sessions

Once inside screen to start a new session use the keyboard combination: C-a c. That is, “Ctrl-a c”. (the mnemonic is c for “create window”) This will create a new window move you to it. To move back to the previous window, do a C-a C-a. You can also use the keyboard combos C-a n and C-a p to move to the Next and Previous windows. Or you can move to a window directly using its number with C-a 3 (or whatever number it is.)

customizing screen with .screenrc

If you are an emacs user or if you use the emacs shortcuts on the command line, than you know that C-a is already used as the command to bring the cursor to the beginning of the line. So what to do? You can change the default keyboard bindings in the .screenrc configuration file in your home directory. If it doesn’t already exist, create it and add the following line:
escape ^Bb

or whatever you want to use as the control sequence. This will change the control sequence from C-a to C-b, other people use other keys, some use the backslash “" instead. So now if you have changed to C-b, then to toggle between windows use:
C-b C-b and so on…

Another good thing to add to the screenrc is code for a modeline, so you can see the available windows:
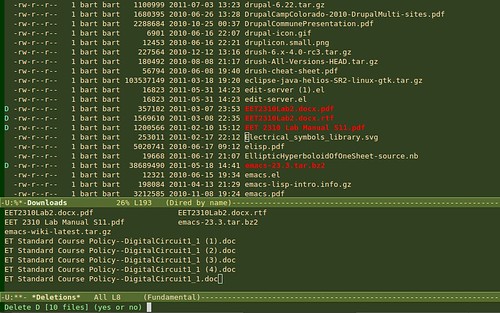
caption string "%?%F%{= Bk}%? %C%A %D %d-%m-%Y %{= kB} %t%= %?%F%{= Bk}%:%{= wk}%? %n "
hardstatus alwayslastline
hardstatus string '%{= kG}[ %{G}%H %{g}][%= %{= kw}%?%-Lw%?%{r}(%{W}%n*%f%t%?(%u)%?%{r})%{w}%?%+Lw%?%?%= %{g}][%{B} %d/%m %{W}%c %{g}]'

This code will add a modeline to the bottom of the terminal that tells you which window you are in and also the numbers or names of the sessions.

Irssi is Screen's BFF

Best of all you can keep a session of Irssi (an irc client) running at all times in a screen session and always be up to date with your favorite IRC channels.

Additional Screen resources

Screen Quick Reference
Stayin' Alive with Screen
Power Sessions with Screen
Guide to Using Irssi with Screen

Setting Up a Web Enabled Lending Library

I started cataloging books for a small community center’s lending library at librarything.com. Librarything.com is a great web site that I highly recommend. If most of your books have ISBNs and you can borrow someone’s barcode scanner, cataloging books at Librarything is a snap: on the “add books page” you scan a books ISBN and all of its information (Title, Author, book cover) will be added by Librarything for you. Of course if you don’t have a bar code scanner or there is no ISBN, you simply type in part of the title or author and select the book from a list of possible matches, this is a bit slower, but perfectly adequate if you are inputting a smaller library.

Once all of the books are added, the social networking goodness begins! You’re library has its own mini-site at Librarything, with a publicly available catalog: Build Up Books catalog and profile: Build Up Books profile. So for a community center, you can send out the URL, and anyone can search the catalog for books they find of interest.

The one problem with this system, is there isn’t a robust system for checking out books. Some libraries have adapted an informal system of tagging books as “checked out” and in the private comments (only visible to the administrator) added the borrowers contact information. This is somewhat acceptable, but first: you would have to give any volunteers access to all of your Librarything account’s permissions (you get all or nothing as far admin rights goes on Librarything). Second there is no way to tell when the book was checked out, when it is due back, and also no way to sort by which books are currently overdue. So I thought I would look into importing the library, once cataloged, into a drupal web site.

Exporting Library from Librarything

Librarything has excellent importing and exporting facilities. To export, sign in to your account and then go to http://librarything.com/more/import. On that page there are links for downloading your catalog as either a comma separated csv file or a tab delimited text file.

Downloading User Uploaded Book Covers

Librarything has over 1,000,000 user uploaded book covers, and it makes them available for free. You need to a developer’s key to access them and there are some restrictions: you can only download 1000 per day and one per second. So with these understandable restrictions, I decided it would be best to download the book covers and store them locally. So yesterday I wrote a python script to download all of the book covers for our library.

The Python Script

I will add a link at the bottom to the script on my Github Repository. So the script I wrote searches through a librarything csv file, finds all of the ISBNs and downloads the book covers from Librarything.

import re, urllib, csv,time

CSV_FILE ='~/Downloads/LibraryThing_export.csv'
IMG_DIR ='~/img/'
DEV_KEY = 'YOUR_LIBRARYTHING_DEV_KEY'
IMG_URL = "http://covers.librarything.com/devkey/" + DEV_KEY + "/large/isbn/"

I use 4 python libraries.

  • Re: for regular expressions to search for isbns.
  • urllib: for downloading the Book Cover from Librarything
  • csv: for creating a map data structure from a parsed csv file.
  • time: for limiting the downloads to one per second.

Also I add a couple of variables. The important one to change is DEV_KEY which contains your librarything developers key. Also make sure the CSV_FILE points at your downloaded CSV_FILE and the IMG_DIR exists. Finally IMG_URL points to the web service on librarything where you can download user submitted book covers, all you need to do is slap an ISBN on the end of that URL and the URL will return either a book cover, or a clear 1x1 gif if they do not have that cover.

# read in the Librarything Export File
lt_dict = csv.DictReader(open(CSV_FILE))
#loop through the rows of the dictionary
for row in lt_dict:
    # grab the ISBN dictionary field
    mystr = row["'ISBN'"]
    # search for a matching ISBN
    mymatch = re.match(r"\[(\d+)\]",mystr)
    # if no match, print the title to STDOUT
    if mymatch is None:
        print "blank isbn for: %s" % row["'TITLE'"]
    else:
        # grab the matching string, this is our ISBN!
        isbn = mymatch.group(1)
        # build the web service request URL
        myurl = IMG_URL + isbn
        # where we will store the downloaded Book cover image
        myfile = "%slarge_%s" % (IMG_DIR,isbn)
        # urlretrieve downloads the image and stores it locally
        urllib.urlretrieve(myurl,myfile)
        print "myurl: %s, myfile: %s" % (myurl,myfile)
        # sleep for 2 seconds
        time.sleep(2)

The hard work is done by csv.DictReader and urllib.urlretrieve. DictReader takes a csv file, parses the first line of the file for field names and creates a dictionary data type, so you can loop through the rows and have access to the fields by name. Urlretrieve, takes a URL and an optional file name and it grabs the file at the URL and stores it locally as the filename you provided.

In a later blog post I will describe the Drupal end of this project: creating a book CCK content type, importing data into Drupal custom content types, and setting up the check out process.

Delete some files in the Downloads folder

My Downloads folder is always out of control. There are always a ton of pdf files that I opened once in a browser but don’t need to save. It’s a pain to open a GUI file navigator, like Nautilus, and double click on each pdf file to view it and see if it should be tossed. However with Emacs, trimming my Downloads directory of old files is quick and easy.

Viewing Pdfs in Emacs

If you see a pdf with an uninformative name like 2010-09.pdf just hit <enter> when the cursor is on the file name, (when the file name is at point). Emacs will open the pdf in a new buffer. Once you have viewed the pdf and have decided its face you can quickly kill the pdf buffer with ’k’ and you’ll be returned to the directory. Now, if the pdf is unimportant, queue it to be deleted with ’d’. If you want to keep the file, but give it a better name, type ‘R’ to rename it. To unqueue a file for deletion, use ’u’. And finally to delete all the files currently queued for deletion, type ‘x’.

Dired mode emacs

Delete old Emacs backup files

If you have a lot of backup files that emacs created with ~ appended to the file name, you can quickly queue them all for deletion by typing ’~’.

Here’s the List of Directory Organizing Commands

key combocommand
open file at point
dQueue File For Deletion
uUnqueue File
~Queue Backup Files for Del
xeXecute Queued Delete Jobs
RRename File
kKill PDF Buffer
C-x C-qEdit Directory as a File

Edit Zip’d or Tar-gz’d archives in place

If you need to edit a file inside a zip or tar archive, simply open the archive by hitting C-x C-s’, and then do another C-x C-s inside the zip buffer to save the archive with the file changes. The archive will be compressed again with your changes.

OMG!: Change File Owner, Group, Mode

key combocommand
Ochange owner
Mchange mode
Gchange group
Zcompress file

Encrypt, Decrypt Files

Use ’:e’ to encrypt the file at point. Emacs will ask who you want to encrypt the file for (ie whose public key to use to encrypt the file.) You can also encrypt the file symmetrically with a password. Once the file is encrypted, there will be two files in the directory: the original file and the encrypted file with ‘.gpg’ added to the file name.

Decrypt

To open the symmetrically encrypted file, click on its name and you will be prompted for a password. You can also type ’:d’ when the filename is at point.

EasyPG Assistant Docs

The program that is used to encrypt the file’s is EasyPG Assistant. EasyPG Assistant Manual

Get More Help

Type ‘C-hm’ (describe mode) while in dired-mode, to pop open a help buffer, with a description of dired mode and a list of commands.

All Key Combinations named in post

key combocommand
dmark file for deletion
uunmark file
xeXecute queued deletions
Rrename/move file
Ochange owner
Mchange mode
Gchange group
Zcompress file
yshow only certain file type
wcopy file name
RETopen file at point
kif in pdf buffer, kill
C-x C-sSave file or archive
iinsert sub-directory
~mark all backup files for deletion
C-x C-qedit directory listing as a file
Cool Things to do in Emacs’ Dired Mode

Nook 1.2 loaded up as an emulator I was able to build an emulator for Nook version 1.2. See my previous post for the prerequisites. Basically you need some utilities installed: smali, baksmali, unyaffs, and mkyaffs2image. You also need the Android SDK installed on your computer. Here are the steps: 1: download the nook 1.2 soft-root image from nookdevs. For the rest of this post I assume you have copied it into the directory ~/nook_dev/ and we will be working on it from there. 2. extract the bravo_update.dat, cd into it and extract root.tgz
mv bravo_update.dat bravo_update-1.2.tar.gz
tar xvzf bravo_update-1.2.tar.gz
3. extract root.tgz
cd Firmware_Update
tar xvzf root.tgz
cd root
4. cd into system/framework and unjar services.jar
cd system/framework/
jar xvf services.jar
5. disassemble the classes.dex file inside services.jar
baksmali classes.dex
6. vi out/com/android/server/ServerThread.smali search for a line that contains
if-lt v0, v1, :cond_309
delete that line. 7. reassemble out/ directory
smali out/
8. copy the new out.dex over the old classes.dex and re-jar services.jar
mv out.dex classes.dex
jar cvf services.jar classes.dex

Now we are going to build an android AVD, so we can extract a single file to use back in this system.

9. if your android SDK tools are in your path Run,
android
else find the android command and run it, or run it from eclipse. This starts the Android SDK and AVD Manager. To create a new AVD, click New… Name: nook Target: Android 1.5 Size: Skin: click Resolution, and fill in 488 x 944 click “Create AVD”. Then click “Details” to see where it was created. It should be at ~/.android/avd/nook.avd 10. unyaffs the system.img and grab a file
cd ~/nook_dev/
mkdir sys_img
cd sys_img
cp ~/android-sdk-linux_86/platforms/android-3/images/system.img .
unyaffs system.img
cp lib/libaudioflinger.so ~/nook_dev/Firmware_Update/Firmware_Update/system/lib/libaudioflinger.so
11. re-create the system.img with the new audio file.
cd ~/nook_dev/Firmware_Update/Firmware_Update/
mkyaffs2image ./system/ system.img
this creates a new system.img 12. Sketchy step where you overwrite the good Android 1.5 platform system.img in your Android SDK with this new one.
mv ~/android-sdk-linux_86/platforms/android-3/images/system.img ~/android-sdk-linux_86/platforms/android-3/images/good.img 
cp ~/nook_dev/Firmware_Update/Firmware_Update/system.img ~/android-sdk-linux_86/platforms/android-3/images/system.img
Remember to change this back later if you want to do non-nook related Android Development. 13. run the emulator!
emulator @nook -shell -show-kernel -verbose

This post will walk you through building an Android Emulator for the Nook step-by-step in Eclipse and via the command-line. These instructions are based on the original instructions located at the nookdevs website.

Pre-requisites:

1. You need to have Eclipse running with the Android SDK. More information on that can be found here. 2. I’m assuming you are developing in a Linux-ish environment. I’m using the amazing Ubuntu Lucid Lynx. 3. download and set up the following tools: smali, baksmali, unyaffs, yaffs2image.

How I Set Up the command-line tools:

smali and baksmali. Description from the developer’s site: “smali/baksmali is an assembler/disassembler for the dex format used by dalvik, Android’s Java VM implementation”. 1. Download them into your ~/bin/ directory. 2. “chmod +x” the wrapper scripts (smali and baksmali) 3. rename the jar files: smali.jar and baksmali.jar.
cd ~/bin/
wget http://smali.googlecode.com/files/smali-1.2.2.jar
wget http://smali.googlecode.com/files/baksmali-1.2.2.jar
wget http://smali.googlecode.com/files/baksmali
wget http://smali.googlecode.com/files/smali
mv baksmali-1.2.2.jar baksmali.jar
mv smali-1.2.2.jar smali.jar
chmod +x smali
chmod +x baksmali
unyaffs description: Unyaffs is a program to extract files from a yaffs file system image. 1. download unyaffs into your ~/bin; chmod +x unyaffs; mkyaffs2image: 1. download mkyaffs2image. I downloaded the yaffs2-binary.tar, untarred it and copied yaffs2/utils/mkyaffs2image to my ~/bin/ and chmod +x it.

Okay we have the tools and our environment is ready!

1. I’m assuming you already have Eclipse set up and running with the Android Development Kit. Nook runs on the cupcake 1.5 platform of Android. So first we have to make sure that the Android 1.5 Platform is installed. Assuming you downloaded the Android SDK into your home directory, run:
$ ~/android-sdk-linux_86/tools/android
This will start the Android SDK and AVD Manager. Click on Installed Packages and look for SDK Platform 1.5. If you do not see it, click on Available Packages and download and install it. 2. Grab the original 1.0.0 image from bn.com (mirrored here: multiupload). 3.Run
$ dd if=signed_bravo_update.1.0.0.dat of=signed-bravo-update.1.0.0.tar.gz bs=1 skip=152
This takes a while. You now have signed-bravo-update.1.0.0.tar.gz 4.Uncompress the new file: signed-bravo-update.1.0.0.tar.gz
$ tar xzvf signed-bravo-update.1.0.0.tar.gz
Now you have the uncompressed folder Firmware_Update,
$ cd Firmware_Update
5. Rename bravo_update.dat to bravo_update.tar.gz and extract it.
$ mv bravo_update.dat bravo_update.tar.gz
$ tar xvzf bravo_update.tar.gz
This uncompresses another Firmware_Update folder, cd in to it.
$ cd Firmware_Update
if you pwd, you’ll be in Firmware_Update/Firmware_Update 6. Extract root.tgz
$ tar xvzf root.tgz
this uncompresses a lot of stuff. All of the Android system image actually. Later we will re-compress the system folder to create the system.img 7. Extract system/framework/services.jar with your favorite unzip utility. I did this from the GUI, right click on file and select “Extract here”. $ cd services 8. disassemble the file classes.dex with baksmai
$ baksmali classes.dex
This create out/ 9. vi out/com/android/server/ServerThread.smali delete the line
if-lt v0, v1, :cond_483
(for the vi-newbies, you can search in vi by typing a forward slash and typing in a phrase like “if-lt”, then type dd, to delete the line, and “:wq” to write the file and quit) 10. reassemble the file with
$ smali out
11. Replace the old classes.dex with this re-assembled file:
mv out.dex classes.dex
12. delete the old out/ directory and re-jar the contents of the services folder, but the not the services folder itself. (I moved the META-INF folder and classes.dex out of the services directory and into the parent framework directory. Removed the empty services directory. Right clicked the classes.dex and selected “compress”, and selected as name “services” and type as “jar” file, then I dragged the META-INF file onto the new services.jar. Yes, I know there is a better way, but I’m kind of new to jar files…)

Now we are going to build an android AVD, so we can extract a single file to use back in this system.

13. if your android SDK tools are in your path Run,
android
else find the android command and run it, or run it from eclipse. This starts the Android SDK and AVD Manager. To create a new AVD, click New… Name: nook Target: Android 1.5 Size: Skin: click Resolution, and fill in 488 x 944 click “Create AVD”. Then click “Details” to see where it was created. It should be at ~/.android/avd/nook.avd 14. unyaffs the system.img and grab a file
cd ~/nook_dev/
mkdir sys_img
cd sys_img
cp ~/android-sdk-linux_86/platforms/android-3/images/system.img .
unyaffs system.img
cp lib/libaudioflinger.so ~/nook_dev/Firmware_Update/Firmware_Update/system/lib/libaudioflinger.so
15. re-create the system.img with the new audio file.
cd ~/nook_dev/Firmware_Update/Firmware_Update/
mkyaffs2image ./system/ system.img
this creates a new system.img 16. Sketchy step where you overwrite the good Android 1.5 platform system.img in your Android SDK with this new one.
mv ~/android-sdk-linux_86/platforms/android-3/images/system.img ~/android-sdk-linux_86/platforms/android-3/images/good.img 
cp ~/nook_dev/Firmware_Update/Firmware_Update/system.img ~/android-sdk-linux_86/platforms/android-3/images/system.img
Remember to change this back later if you want to do non-nook related Android Development. 17. run the emulator!
emulator @nook -shell -show-kernel -verbose
Nook Emulator screenshot

The hard drive on my laptop started clicking quite ominously, so I figured it was time to order a new hard drive. I backed up my photos to the cloud (Flickr and Picasa) and backed up all my music and docs to Dropbox and Google Docs and waited for the new hard drive to arrive. Files are files: you just need to keep a regular backup; and email already lives in the cloud. That leaves my development environment.

Here are the steps I’ve followed to move my development set up to a new computer.

1. open up Synaptic and download Eclipse. There are several Eclipse packages available. I selected the big Eclipse package which includes the JDT (Java Developer Tools) and PDE (plug-in development tools). I’ve had trouble before when I selected one of the smaller eclipse packages and tried to add the plug-ins I needed separately.

2. Download or copy over the Android SDK.

3. Put the Android SDK tools directory in my PATH in .bashrc
b. then type ‘bash’, so the new .bashrc takes effect.
c. type ‘adb’, to make sure the android SDK tools are in my PATH.

4. open up Eclipse and go to Help->Install New Software… click “add” to add a new tools depository, and add the android developer tools repository: https://dl-ssl.google.com/android/eclipse/.
b. once the new depository is loaded, select the Android Developer Tools and Android DDMS and wait for Eclipse to download and install them.

5. moved my private signing key over.

6. moved over my projects and imported them through File->Import… ->Existing Projects into Workspace.
b. if you get any errors, try right clicking on the project and select Android Tools->Fix Project Properties

7. Export an app and sign it with the key you moved over. (this is the scary part, if you lose the signing key you used to originally sign your app, you will not be able to provide any more updates to your app in the Android Market!)
a. File->Export … Android->Export Android Application –> select the project you want to Export –> Use existing keystore, (click location to locate it.) type in your password….

8. Plug your dev phone into your workstation and install the app.
a. adb install -r /path/to/YourApp.apk

Whoo Hoo! The development environment (for android at least) is all moved over.

I just updated my G1/dream to CyanogenMod-4.2.15.1 with danger spl. The actual flashing of the 3 different roms (danger-spl, defanged base, cm-4.2.15.1) part only took about 20 minutes. This was after I had already downloaded all of the necessary files, copied them to the SD card and verified my radio version (Settings->About phone->Baseband version).

The first time you root your phone it will take a bit longer than this. One of the reasons it is much faster after the first time, is because during the initial rooting process, you load a “recovery utility” that you will use later.

Now to wait for CyanogenMod-5.0.7 to drop.


So how do I know if the Danger SPL is loaded? (via this cyanogenmod forum post)

1. Turn off phone.
2. Hold the camera button on the side and press the red power button. If you are using Danger SPL, you’ll see a white screen with 3 androids riding skateboards. At the top of the screen you’ll see the text:
HBOOT-1.33.2005

like this:
G1/dream android phone: danger spl screen

Tonight cyanogen is releasing 5.0.7 of the cyanogenmod. This is a modified ROM for android phones, that will finally allow g1 phone users like myself to run most of the latest android apps on our phones. It will add most of the Android Eclair functionality to older android phones, except for Live Wallpapers, but I didn’t really see myself using any live wallpapers anyway.

The one catch is that the new ROM is too big to fit inside the G1’s tiny internal memory. The G1 has 64 MB of room for ROMs, and according to Cyanogen no matter how he tried to squeeze the ROM 64 MB was still 4 MB too small. So in order to load the new ROM with the eclair goodies, you need to use an SPL (second program loader), to load the ROM. More info on the Danger SPL.

So in anticipation of tonight’s release, I am installing the Danger SPL on my phone. The danger spl how to at cyanogenmod.com says that the pre-requisites are a rooted G1/Dream phone (check) and a compatible radio, with links to the radio images. So I downloaded the radios, but nowhere in the rest of the article did it mention what to do with the radio images. I was worried, but then I realized you just need to have one of the radios currently on your phone or you need to install one of the images I downloaded. After searching the interweb for how to check which radio is installed on your phone, I found this article, which says look in your phone under: Settings->About Phone->Baseband version, the last part of the number is your radio version. In my case its 2.22.19.26I, which is compatible!

So on to updating the ROM!

After watching several videos from last week’s DrupalCon I had an itch to try out Drupal 7 for myself. The problem was I already had a site I was testing on my laptop. I could’ve downloaded it to my test server, but I’ve been testing alot lately at coffee shops with spotty wifi, so I decided I’d add some entries to my hosts file instead and write up a quick How-to. (pre-requisites: You must have apache, php and mysql already running on your workstation. On ubuntu this is as simple as opening synaptic and searching for each of these packages and installing them: apache2, php5, mysql.)

Multiple development websites in 3 steps.

1. Edit your hosts file. On Linux this is located at /etc/hosts. On Windows machines (XP, Vista, Windows 7) it is located at %SystemRoot%\system32\drivers\etc\hosts. On Mac OS X, its located in: /private/etc/hosts add a new entry for each website you want to test (don’t worry you can add more later): 127.0.0.1 d7 127.0.0.1 d6 in this case I added two entries: one to test drupal 6, and a second to test drupal 7. To check that everything is working, open up a teriminal and ping d7 you should see something like this:
$ ping d7
PING d7 (127.0.0.1) 56(84) bytes of data.
64 bytes from localhost (127.0.0.1): icmp_seq=1 ttl=64 time=0.044 ms
64 bytes from localhost (127.0.0.1): icmp_seq=2 ttl=64 time=0.047 ms
64 bytes from localhost (127.0.0.1): icmp_seq=3 ttl=64 time=0.051 ms
64 bytes from localhost (127.0.0.1): icmp_seq=4 ttl=64 time=0.055 ms
2. Edit your Apache config file Add a
<VirtualHost *:80&gt;
    ServerName d7
    DocumentRoot /home/bart/Public/drupal-7.x-dev
</VirtualHost&gt;
<VirtualHost *:80&gt;
    ServerName d6
    DocumentRoot /home/bart/Public/drupal-6.16
</VirtualHost&gt;
3. restart apache
$sudo apache2ctl restart
Now you’re ready to test the websites by opening up the URLs: http://d7 and http://d6 in a browser. As a bonus: go check out the DrupalCon2010 screencasts at archive.org.