One of the difficulties of keeping a Drupal website completely in version control, is that a lot of the configuration is stored in the database. Each change you make to a site via clicking and saving on a site administration page is saved in the database. It is difficult to keep a history of these changes without writing the entire database to a file and then checking that into version control. But you don’t want to commit an entire database into git. This is where the Features module comes into play. It helps separate the site’s configuration in the database from the site’s content. The Features module allows you to export configuration options from the database into a new module. Then you can check this new module into version control and keep track of the history of changes, and keep backups of a site’s configuration that is separated from the site’s content and database.

Features Concepts

Exporting Features

Exporting a feature is the processing of exporting a configuration option (or a series of options) from the database and saving them as a features module. Let’s say you are using Bartik (or another theme that utilizes the color module to allow you to customize a site’s colorscheme.) and you change the background color of the site. When you make this change via the web interface, the configuration change is saved in the database. To export this change as a feature, you click on admin/structure/features/create. Create a name and description for your new feature, such as “Major Ursa Bartik Colors” and “Color scheme for Bartik theme used on Major Ursa”. Next under Edit Components, select Strongarm: variable. Then select “color_bartik_palette” and perhaps “color_bartik_stylesheets”. Then click on the Download Feature button. This will download a new module to your desktop with the configuration options saved as a features module. This is only step one. Next you will need to upload this new module back up to your website and enable. Once the module is enabled, the configuration is being run from code from the module, not from a configuration option in the database. This is known, confusingly enough, as reverting a feature.

Revert a Feature

To revert a feature is to take the configuration options that are written in a custom feature module and override the database configuration. Revert a feature with drush
drush features-revert  mu_bartik_theme
The above code would read the configuration options from the code in the mu_bartik_theme and overwrite the current configuration in the database.

Override a Feature

To override a feature, means to take the configuration that is currently in the database and use those options to override the previous custom feature module you created. This basically updates the old feature module with what is currently live on the site and in the database. Then you will be able to download an updated feature module and can commit this new change to your git repository so you have a history of site changes, upload the changed feature module mu_bartik_theme to your site and (ahem revert the change again). Here’s the drush command to override a feature
drush features-override mu_bartik_theme

Drush Commands

Vim

http://majorursa.net/hide_vi.jpg

Vi Commands

vi key combocommand
:q!quit without saving
:wqwrite and quit
:qquit
:%s/oldword/newword/gsubstitute all oldword occurences with newword in entire file
:lslist buffers
:b1switch to buffer 1
:bnswitch to buffer n
:vsvertically split window (create side by side windows)
dwdelete word
d$delete to end of line
dddelete current line
.repeat last change
yycopy, yank line into buffer
ppaste the line in buffer after cursor position
cwchange word
uundo!
iinsert mode
escape, exit insert mode
/VirtualHostsearch file for phrase “VirtualHost”
nmove to next occurence of search phrase
100Gmove to 100th line
1Gmove to first line
Gmove to last line

add to .screenrc to get Color Schemes working

attrcolor b ".I"
termcapinfo xterm 'Co#256:AB=\E[48;5;%dm:AF=\E[38;5;%dm'
defbce "on"
term screen-256color-bce

.vimrc

" Colors!!
set t_Co=256

" color theme
" colors zenburn
colors calmar256-dark

set showmode "show current mode down the bottom

"Setting the status line...

set statusline=%f       "tail of the filename

"display a warning if the file format isn't Unix
set statusline+=%#warningmsg#
set statusline+=%{&ff!='unix'?'['.&ff.']':''}
set statusline+=%*

"display a warning if file encoding isn't UTf-8
set statusline+=%#warningmsg#
set statusline+=%{(&fenc!='utf-8'&&&fenc!='')?'['.&fenc.']':''}
set statusline+=%*

set statusline+=%h      "help file flag
set statusline+=%y      "filetype
set statusline+=%r      "read only flag
set statusline+=%m      "modified flag
syntax on

Window Commands

C-w sSplit window horizontally
C-w vSplit window vertically
C-w xExchange windows
C-w wjump to next window
:onlykill all windows but current
C-w =equalize all window sizes

Edit Keys: used with argument

c change

  • cw = change word

d delete

  • d$ delete til end of line

r replace

  • r5 replace 5 chars

y yank

  • yy yank entire line

These are the steps, using git mostly, needed to work on an issue from the drupal issue queue.

First Time: Clone Drupal Core

cd into your development folder and git clone drupal core, (in this case, I’m working on a drupal 8 issue).
cd ~/projects/
git clone --branch 8.x http://git.drupal.org/project/drupal.git drupal-8.x
cd drupal-8.x

Later, Refresh Repository with Git Pull

After you’ve already cloned a copy of drupal for testing and development, all you have to do is run “git refresh” to update your copy.
cd ~/projects/drupal-8.x/
git checkout 8.x
git pull
This will download the most recent commits to drupal-core from the central git repository and apply them to your 8.x branch.

Create a topic branch for your issue

Its a good idea to do development work in a separate development branch. The following creates a new branch and checks the new branch out, so any subsequent changes will be made to that branch.
git branch fix-typo
git checkout fix-typo
To list all of the branches, run:
git branch
git will show all of your branches, and it will star the current branch
8.x
  * fix-typo
    profile-docs
Next work in your topic branch, make some changes.

Work without fear

With git, you can work without fear! if you foul things up, getting back to a previous state is easy with git reset. The following command will return the state of your code to that of the last commit.
git reset HEAD --hard
Also, if the last good state was a few commits ago, you can reset the current state to a previous commit with
git reset  00581a73afab6 --hard
where 00581a73afab6 is the SHA1 of the commit you want you working directory reset to. to find previous commits and their SHA1’s, run git log:
git log
This will give a listing of the entire commit history. You can travel back in time! To see what files have changed since the last commit, run:
git status
This will show which files have been modified. To see what the actual changes are, run:
git diff HEAD

Stage and Commit Changes

Once you have some changes that you’d like to preserve, you first stage them to the index:
git add thefile.ext
Now when you run git status, you will see that the file is now under the header “Changes to be commited.” This intermediary step may seem strange if you are new to git, but it is very handy. It allows you to break up changes into separate logical commits. You can stage and commit one logical set of changes, and then stage and commit another set of changes. Although, it may be better to separate different issues into different topic branches.

Commit changes

Now that your changes are staged, it is time to commit them:
git commit
This will open your default editor, so you can write a descriptive commit message.

Create a Patch

Now that your changes have been made and committed, its time to create a patch that you attach to the drupal issue queue. First switch back to the 8.x branch:
git checkout 8.x
Next, create a patch with git diff. Drupal has a specific naming convention for patches ([module_name]-[short-description]-[issue-number]-[comment-number].patch). In the case of a patch for drupal core, this can be shortened to [short-description]-[issue-number]-[comment-number].patch The following git diff command will print out all of the difference between the current branch (8.x) and the listed branch (fix-typo):
git diff fix-typo > fix_typo_in_bartik_css-902839-1.patch

Use git format-patch to include committer information

Alternatively, you can use the git format-patch command to include the committer information in the patch:
git format-patch origin/master fix-typo > fix_typo_in_bartik_css-902839-1.patch
Next go to drupal queue, write up a description, attach the patch, and change the status to “needs review”.

I am a big fan, user, and tinkerer of Scuttle: the Open Source Social Bookmarking System. In case you have never heard of it, Scuttle is similar to other social bookmarking web applications like Delicious and Pinboard. It allows you to save website bookmarks on a public site, so that other people can follow your bookmarks and you can follow other people with similar interests. Although unlike delicious and pinboard, most scuttle instances are decentralized with only a few users. So there is less of the social aspect. (That is until someone figures out how to federate all of the decentrailized installations.) You can see some of my work on different Scuttle projects on my github profile. And here’s my bookmark site which shows scuttle in use.

Scuttle Web App Additions

I have a fork of the original scuttle web app. I have add a couple of features recently. I was getting frustrated because I would bookmark a website, and scuttle would tell me that that page was already bookmarked a year ago and so would keep the bookmark in the stream a year ago, even if I updated the bookmark. The problem with that approach is that when something is bookmarked a while ago and I’m researching the topic again, I want the updated bookmark to show up with the most recent bookmarks. So I altered the code to do this. When I resave a bookmark or update it, Scuttle now saves my updated bookmark in the stream with recent bookmarks. It shows both the original date and the modified date.

Firefox Scuttle Plug-in Keyboard Shortcut

There is also a firefox plugin for scuttle to update your scuttle site. I added a keyboard shortcut to the plugin on my fork of it at github, My addition adds a keyboard shortcut at “Shift-Ctrl-B”, so if you’re reading a good article, you can just type “Shift-Ctrl-B” and the “scuttle save bookmark” window will pop up. If you are interested, you can download the firefox plugin here.

Web Scraping

Web scraping is a technique of extracting information from websites.

Scraperwiki

http://scraperwiki.com

Scraperwiki has tutorials on scraping webpages for data, written for Python and Ruby.

Scraper: a Plug-in for Chrome

Scraper is a cool, chrome plug-in I’ve just discovered that makes scraping web pages easy. Just
  1. Highlight part of a table, at least a row, that you want to scrape.
  2. Right-click on the selection. Select “scrape similar” from the pop-up menu, and some reasonable scraping defaults will appear.
  3. Press the “Export to Google Docs..” button to save the scraped data to a google docs spreadsheet.

Google Refine

Use to clean up messy and inconsistent data

Chrome Developer Tools

use to see the DOM underlying web pages

If there is a table of data on a web page that you want to scrape, select it with your mouse, right click on the selection and choose inspect element in the pop up menu. This should work in Safari, Chrome or Firefox with the Firebug plug-in.

Data Analysis

R Notes

Common R Stuff

Download and Install R Package

install.packages("XML", dependencies = TRUE)

Load a Module

library(XML)

Scrape an HTML Table

library(XML)
u = "http://en.wikipedia.org/wiki/World_population"
# function from XML library, downloads and parses URL for data in HTMLtables
tables = readHtmlTable(u)
names(tables)
tables[[2]]

R Tutorial

Basic R

# x is a vector with values 1 2 3 4 5
x <- 1:5

# create a function
square <- function(x) {
  x^2
}
  
# call fuction with vector x
square(x)
: [1]  1  4  9 16 25

R help

getting help with ?
  • type a ?rnorm, to pop open a manual Page on the R command rnorm
  • or try ?boxplot to get a help page on the R boxplot function

Using Famous Datasets

library(datasets)
data(faithful)
hist(faithful$waiting,breaks=25)

faithful.png

Reading Data into R from Files

dat <- read.table("thedata.txt", sep=":")
# space delimited, also first line is a header
dat2 <- read.table("thedata.txt", header=TRUE)
# csv
dat <- read.csv("thedata.csv")
print(dat)

Reading Data from STDIN

  • To read data from STDIN, call the scan function with the file parameter left blank
  • Enter a blank line or Ctrl D to end data input
> nums <- scan()
1: 75  48  61  48 150  49  57  39  27  51  46  50  62  51
15: 
Read 14 items

Reading a Line of Space Separated Data into a vector

nums <- scan(textConnection("75 48 61 48 150 49 57 39 27 51 46 50 62 51 50 58 38 34 59 44 24 39 40 33 49 33 34 32 35 30 23 39 36 25 20 32 43 52 42 44 46 51 47 51 44 33 38"), sep=" ")
  median(nums)
  mean(nums)
  deaths <- nums[-5]
  mean(deaths)
  median(deaths)
  sd(deaths)
: [1] 44
: [1] 44.93617
: [1] 42.65217
: [1] 43.5
: [1] 11.48761

Generating a Histogram

# Data pasted from another document can be placed in a vector
  #   via the following composition of functions
  # textConnection can also be used to read data from stdin
  nums <- scan(textConnection("75 48 61 48 150 49 57 39 27 51 46 50 62 51 50 58 38 34 59 44 24 39 40 33 49 33 34 32 35 30 23 39 36 25 20 32 43 52 42 44 46 51 47 51 44 33 38"), sep=" ")
  hist(nums, main="US Lightning Death's 1959-2005")

lightning.png

Trimmed Mean to the Rescue

library(datasets)
data(airmiles)
median(airmiles)
# holy right skewed!
mean(airmiles)
# same as median
mean(airmiles,trim=10)
# so its, the top 4% distorting the mean
mean(airmiles,trim=0.4)
#same as median
mean(airmiles,trim=0.5)
: [1] 6431
: [1] 10527.83
: [1] 6431
: [1] 7226.667
: [1] 6431

Drawing a Scatterplot with a Linear Regression line

library(Devore7)
plot(ex12.59)
my.reg <- lm (ex12.59$y ~ ex12.59$x)
abline(my.reg)

regression.png

Putting 2 plots on 1 image

> par(mfrow=c(2,2))
> boxplot(my.p)
> boxplot(my.h)

Using Reduce and Map

Reduce(f=function,x=vector)

Reduce takes a vector of values, and a binary function and accumulates the values returned over the entire vector of values.

Map(f=function(x){..},x=vector)

Map takes a vector of values and a unary function, runs the function on each value and returns the vector of return values.

here’s how to combine them

This function returns the cumulative distribution function of P(x<4) of X~poisson(5).

Reduce("+",Map(function(u){exp(-5)*5^u/factorial(u)},0:3))
: [1] 0.2650259

ANOVA

SSTr - Sum of Square between Treatments

### my.100,m.125,m.150,m.175 are vectors we are analysing
length(m.100)*sum((m.100-mean(m.100))^2)+length(m.125)*sum((m.125-mean(m.125))^2) + length(m.150)*sum((m.150-mean(m.150))^2) + length(m.175)*sum((m.175-mean(m.175))^2)

SSE - Sum of Squares within Treatments

### b.1,b.2, b.3, b.4 are rows of values
### \Sigma (X_{ij} - X_{bar_dot})^2
m.SSE <- sum((b.1-mean(b.1))^2) + sum((b.2-mean(b.2))^2) + sum((b.3-mean(b.3))^2) + sum((b.4-mean(b.4))^2)

Further Reading

Using R with Org-babel

to export a graph created by R, use the following line to start the R code:

&#35;+begin_src R :results graphics :file lightning.png :exports both

Parameters explained:

  • :results graphics exports the results as a graphics file.
  • :file lightning.png exports the graph to a file named lightning.png
  • :exports both exports both the code and the results

to end the R code use the following line

&#35;+end_src

R Emacs Tips

M-x R

type M-x R to start the inferior R process in an emacs buffer

History

if you start R-mode in the same directory each time and save the session at the end of your session, then your history and session variables will be preserved between sessions.

Git

Git Show

Show a particular commit with git show

This will show the commit as a diff.

git show HEAD^^^

Also you can use the commit’s sha1 as an argument

git show 62114826e3f

Set git to output color

git config --local color.ui auto

This command adds the following to your .gitconfig file:

[color]
       ui = auto

Git Bisect

Try to find where in the version history a bug first appeared.

# start bisect
git bisect start
# set good point: there was no bug here, this can be a tag, SHA1, or HEAD~18 ...
git good v1.2.6
# set bad endpoint: we know it had shown up by here
git bad master

# bisect will select a commit half way between good and bad
# test ... then tell git if its good or bad
git bisect good
# it will split the other half in half
git bisect bad
# when you've found the bad commit, reset the branch with
git biset reset
Git

Using Git Log

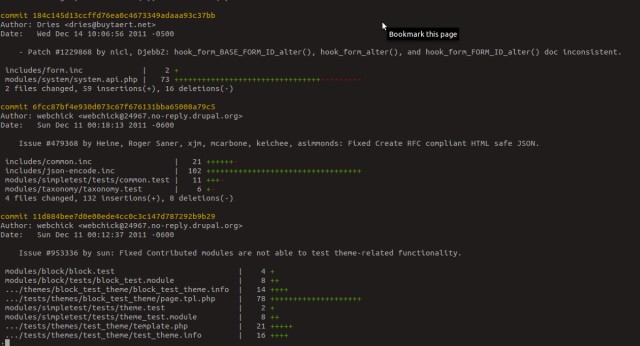
git log —stat

If you’d like to see the number of changes in each file, add the —stat option.

git log —since=“3 weeks ago” —until=“yesterday”

Git log also provides an intuitive way to provide a date range, with —since and —until options.

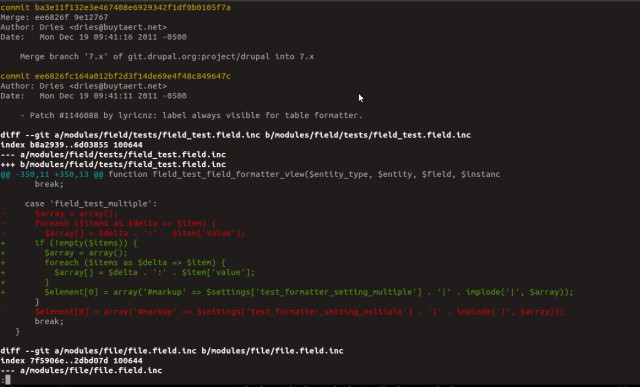
git log -p

With the -p option, git log will show patches of each of the commits.

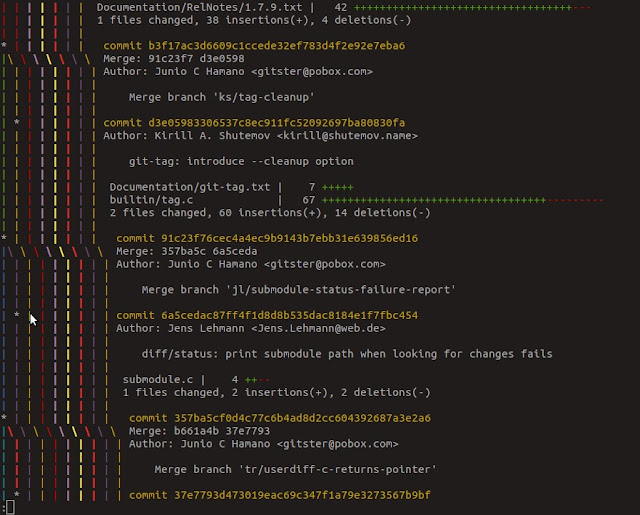
git log —graph

Git log with the —graph option prints a graph along the left edge to show branches of the repository.

The stars in the graph show which branch the commits are on.

The full command for the graph screenshot above is:

git log --graph --stat --pretty=short

The repository used in the graph example is the git repository itself. You can clone it here:

git clone git://github.com/gitster/git.git

The repository used for the first two examples are from Drupal. You can also clone drupal:

git clone --branch 7.x http://git.drupal.org/project/drupal.git
Git

Start Using Git on a Project

# cd into project your working on
cd <project>
# initialize a git repository
git init  
# add all of the files to the repository
git add .
# now commit the files to repository
git commit -m "My first commit message"

Later, check which files have changed and are out of sync

# this will list changed files and new files
git status
# this will add the newly updated updated_file.php to the commit
# staging area
git add updated_file.php
# commit changes with a good change message
git commit -m "Fixed missing name bug in updated_file.php"

Create a remote repository

# ssh into server and create repository directory
ssh boris@vladivostok.net
mkdir myproject
cd myproject
# --bare option means this repository will be pushed to and pulled
# from but never worked in directly (ie it will be a repository without working
# files).  This caused me no small amount of confusion when I first
# started using git.  
git init --bare
# exit out of distant vladivostok server
exit
# cd into local project
cd &lt;project&gt;
# add the remote repository
git remote add vladivostok ssh:boris@vladivostok.net:myproject
# now you can push a branch of the repository to the remote
# repository, "master" is the default main branch in git
git push vladivostok master

Sweet! Now your code is backed up on a remote server. In fact your code’s entire history is on the remote server. Everytime you make a commit on the local server, you can push that change to the remote server as well.